nature

The Western Rocky Mountain Bluebird

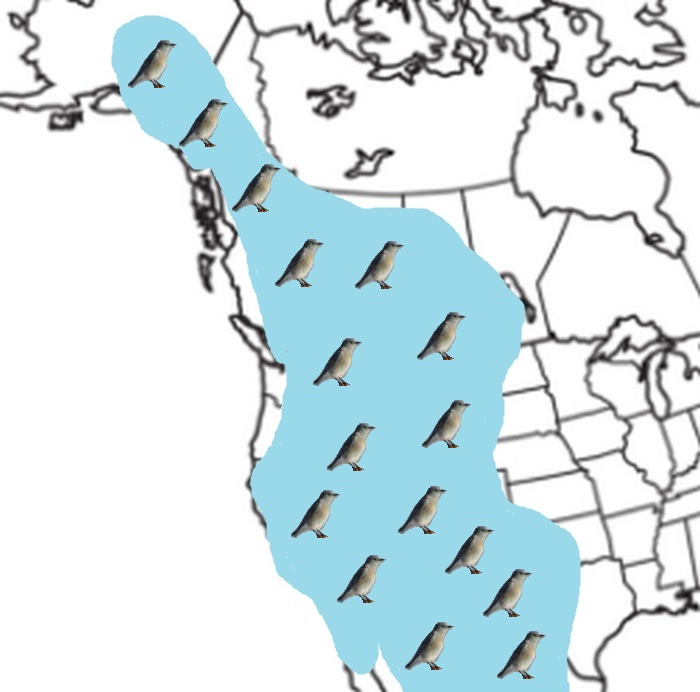
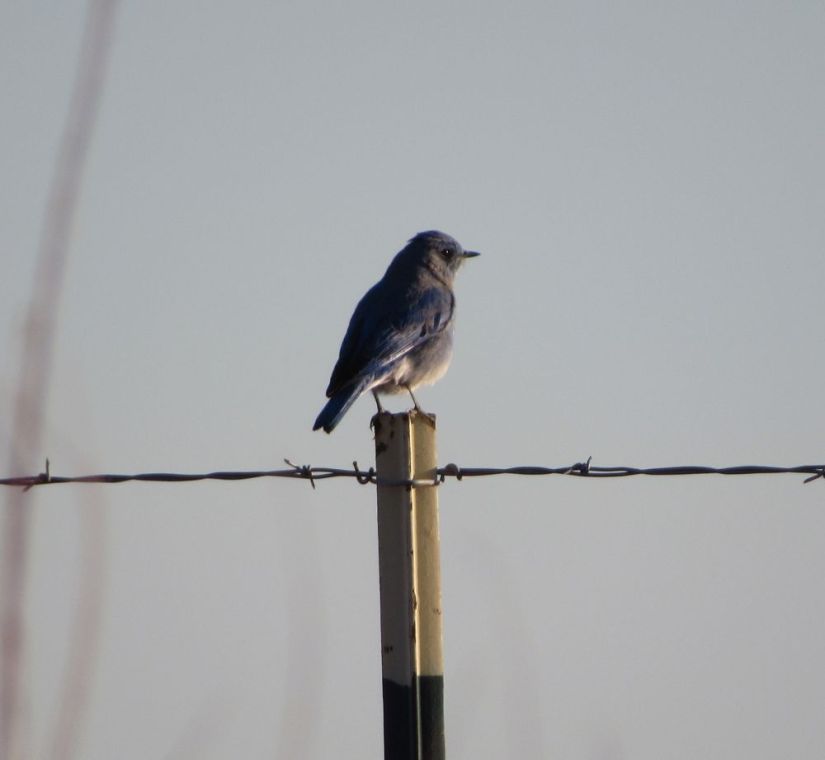
A member of the Thrush family, the Western Bluebird or Rocky Mountain Bluebird can be seen in open meadows near trees, sagebrush prairies, pinyon-juniper woods as well as mountainous areas and Alpine zones above the treeline; in the vicinity of the Rocky Mountains of North America. Continue reading for photos, facts and footage of the beautiful Rocky Mountain Bluebird or Sialia currucoides.

migration3

The Rocky Mountain Bluebird often forages by perching or hovering and then darts out to catch flying insects once their prey has been spotted. Beetles, grasshoppers and caterpillars are also free game. In wintertime they forage for wild berries such as juniper berries, mistletoe, hack berries or anything else they can find. If you have ever caught a glimpse of one of these birds fluttering around, it is like a small piece of the most beautiful blue sky. The female pictured above is modestly dressed, while the male of the species is somewhat more decorated with more blue on it’s breast and darker blues on it’s back seen here:

resized1

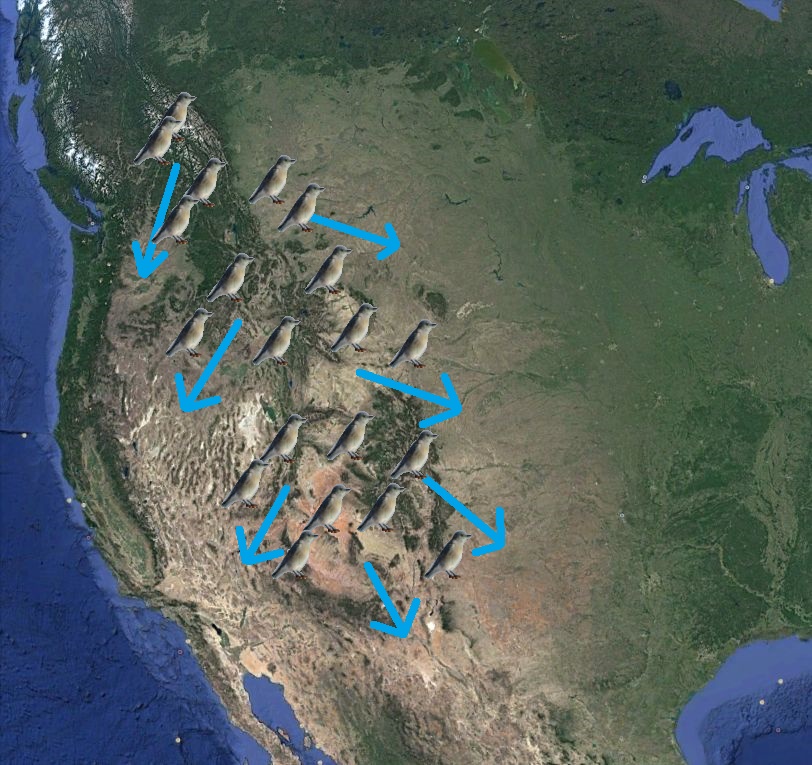
The Rocky Mountain Bluebird dwells in high elevations during the summer months where insects are plentiful. They nest in empty hollows and crevices among trees, rocks, buildings or cliffs. Then as the weather begins to change, these breathtaking birds assume a slow, nomadic migration from high elevations down to the lower areas near the Rocky Mountains in search of better foraging grounds.

migration8

There are a few ways to attract these birds to visit your yard on their yearly migration routes. One way is to grow a garden, including some of their favorite berries mentioned above, so that they have a place to forage for food during winter months.

These birds mate and raise young twice per year, having broods of between four and eight chicks at a time, usually during the spring months when they return to higher elevations.
If you live near the Rocky Mountains, keep an eye out for these striking blue creatures of nature and let me know if you have seen one

press here for —> HOME

I am a participant in the Amazon Services LLC Associates Program, an affiliate advertising program designed to provide a means for me to earn fees by linking to Amazon.com and affiliated sites. Thank you for stopping by!

Gardening

Propagating Raspberries and other Perennials

Every year I dig, divide and store my raspberry canes and other perennial garden plants, over the winter, in order to make more plants in the spring; Expanding the garden, and having enough to share, sell, or whatever I like. Why do I think it’s a good idea to dig them in the fall? Because digging up and transplanting raspberry plants in the spring seems to cause them stress; many of my trans-plantings have failed this way (about 90%).

So I harvest my canes in the fall and store them in a cool, humid environment. This gives them time to recover from being divided, and gives them a chance to grow roots and shoots. It basically gives them a better chance to get a head start, before they are transplanted and called upon to perform. This next image shows bare root raspberry canes which have been stored over the winter. Notice the white growth around the roots. If you dig and divide your plants in the spring, they will have to grow these white roots before they can proceed with leaves, and may be set back or die under the stress.

canes

Here is the process that I use: first trim the Canes and remove the leaves, then dig up the roots, being careful not to damage them. You can remove the soil by pounding the clod until it breaks away, then separate the canes by pulling them apart or by cutting them apart. Each cane should have a section of roots and large roots can also be kept. Roots will grow their own cane.

canes2
Wrap the roots in a moist towel and store in a partially breathable bag for the winter. I use a dog food bag and store my roots in my cellar. You could keep them in a refrigerator or in a cool dark room. Just be sure to check them and don’t let them get too dry. On the other hand, don’t get them too wet either. Too much moisture will promote mold, slime and decay. I like to stay at about 50% humidity – you can achieve this by using a dog food or bird seed bag, folding the bag over on top, allowing a little bit of space for the roots and canes to breathe.

raspberry canes
Five months later, my stored roots have growth protuberances which is a great sign that they are alive and ready to grow. I dig a few holes in the backyard, water them in and plant my best canes. And there you have it: more raspberries than I could want. Below is the full video demonstration on youtube:

Please feel free to leave a comment, the internet and I would like to know what you think about it.

press here for —> HOME

I am a participant in the Amazon Services LLC Associates Program, an affiliate advertising program designed to provide a means for me to earn fees by linking to Amazon.com and affiliated sites. Thanks for stopping by!

nature

Why Did I Start An Observation Beehive?

Last year during the long winter months, I was daydreaming about how it would be cool to have an ant farm. The ants would prosper and get big enough that I could install a tube that would let them outside. They would bring things inside, and I would get to see all of their activities.

Later on, I was thinking about Honeybees and the tough time that they have been having lately. I wished that I could somehow do my part and thought about getting a backyard beehive and then – the two ideas clicked together.

Instead of an ant farm, I will have a BEE FARM! IN THE HOUSE! This will be so cool and I will get to see the inside of their hive and watch larva develop into adults and learn. I was so excited about this idea.

pupae

So I went for it. I Started putting pipes together and making things. I ordered a nuk of bees – about three pounds of worker bees and a freshly mated queen. Apiaries sell nuks once a year in the spring.

I learned so much about bees from doing this. I went from having a vague knowledge of honeybees, to looking up articles about honeybees pretty much every day for about the first month after I got them.

The bees made honeycomb and filled it with honey at an alarming rate. “Be prepared to install an expansion” is one thing I have to say. This is one of the coolest things that I have ever done and has made me feel very excited.

Getting to see the up close and personal happenings of bees in my room was an experience like no other. Below is a short video I made on Youtube

Here is a list of the supplies I used to build the beehive:

Empty Aquarium

Polycarbonate Tubing

Window Screen

Elmer’s Wood Glue

Wooden Slates

Light Duty Staple Gun

Also, check out pre-made Observation Beehives

Please feel free to leave a comment, the internet and I would like to know what you think about it.

press here for —> HOME

I am a participant in the Amazon Services LLC Associates Program, an affiliate advertising program designed to provide a means for me to earn fees by linking to Amazon.com and affiliated sites. Thanks for stopping by!

Gardening

Grow your own garden seed

Growing your own garden seed year after year is sustainable, self reliant, satisfying and a big money saver. I am proud to say that I have not purchased seeds for over 20 years now. It took research and years of trial and error to learn how to grow my own garden seeds.

Some seeds are easy to grow, like beans for instance. If you grow beans, you already have next years seed – just let the beans dry on the plant. It’s the same story with corn: Once you have grown corn, all you need to do is to let the corn dry on the plant to get seed for next year.

In order to grow your own seed, it’s best to start with heirloom or open pollinated seeds. Heirloom seeds have been reproducing the natural way for hundreds of years and are sustainable for growing your own seed.

Use no less than twelve plants to grow any one kind of seed. If you use just one or two plants  for seed each year, the gene pool will not be diverse enough to sustain good quality offspring. In other words, your seeds will become inbred. I have done this and it seems ok at first, but as the years go by, the plants get smaller and weaker until finally, they just fail. So always use as many specimens as you can.

Something else to look out for is cross pollination. Any two plants that are related will cross pollinate, giving you a hybrid seed – which you don’t want. Some plants are related that you might not ever suspect. Here is a quick grocery list of a few related plants that will cross:

Any one set of the above groups of plants will cross pollinate with each other. On the other hand, you also have plants that are self pollinating. Even though these plants might be related to their neighbors, it won’t matter. Self pollinating plants do not rely on insects or wind and will not cross pollinate unless you force them to cross by hand. Plants like tomatoes, peppers, beans and peas will not cross and it’s ok to grow different varieties in the same space.

Some plants such as corn will produce seeds in the same season, while others take two or three years to produce seeds. Below is a list of links to my quick and easy YouTube tutorial videos on how to grow your own seeds for several different plants. I invite you to check these out if you are curious and would like to learn more about growing your own seeds. Enjoy!

How to Grow Onion Seeds

How to Grow Parsley Seeds

How to Grow Parsnip Seeds

How to Grow Carrot Seeds – Part 1

How to Grow Carrot Seeds – Part 2

How to Grow Beet Seeds – Part 1

How to Grow Beet Seeds – Part 2

How to Grow Cabbage Seeds – Part 1

How to Grow Cabbage Seeds – Part 2

Please feel free to leave a comment, the internet and I would like to know what you think about it.

press here for —> HOME

I am a participant in the Amazon Services LLC Associates Program, an affiliate advertising program designed to provide a means for me to earn fees by linking to Amazon.com and affiliated sites.

Survival

Survival: The Go Bag

Whether it’s to prepare for an emergency or to go on a survival trek, the go bag is a great idea for good measure. All of the survival gear in your pack should be light weight and useful, especially if you need to be on the go.

Go Bag2

The survival kit, deconstructed: From top left, moving right.

  • First off, a mess kit for cooking and eating
  • A simple lightweight cook pot
  • Lightweight and durable backpack with plenty of pockets
  • Lighters, because they are easy to use and efficient – but they can break, so as a backup, I pack a magnesium fire starting kit. Magnesium fire starters are safe, fail proof, waterproof, and they last a very, very long time
  • A spool of heavy fishing line. There are several ways that this can come in handy: Setting snares and other traps, Fishing, fixing and mending fabric, hanging food to dry, fastening shelter together, etc
  • Next I have a collapsible shovel to help find food, bury excrement or to use as a light weapon
  • Small hatchet for chopping wood, and to use as a weapon
  • Compass just in case you get disoriented – it could happen?
  • The classic “Swiss” style army knife utensils – because eating with your hands on the go is messy – unless you pack napkins
  • Pocket sized folding saw and serrated pocket knife. The ability to saw can come in extremely handy if you need to craft something out of wood
  • Last but not least, the Lifestraw. A personal water filter that can clean up to 10,000 gallons of questionable water into perfectly drinkable and dare I say delicious water. This is my #1 top item for preparedness, since dehydration can kill a person faster than most other imminent dangers on the go.

Keep in mind that most people who find themselves in a dangerous wilderness survival situation were “only going hiking for the day” and end up getting stranded or lost. If you have a lightweight pack like this one, wouldn’t it be worth it to take with you on every hike for safe measure?

To check out some of these items in use and on the go in a survival situation, I welcome you to enjoy my survival video series on YouTube here:

Hank vs Wild – Episode 1

Hank vs Wild – Episode 2

Hank vs Wild – Episode 3

Hank vs Wild – Episode 4

Please feel free to leave a comment, the internet and I would like to know what you think about it.

press here for —> HOME


I am a participant in the Amazon Services LLC Associates Program, an affiliate advertising program designed to provide a means for me to earn fees by linking to Amazon.com and affiliated sites.